Quilting Part 1 Quilting Part 2 Quilting Part 3 Qulting Part 4
Carding the Wool
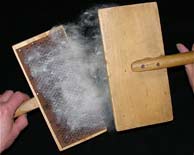
Traditional Carding of the Wool
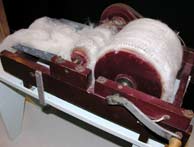
The carding can be done in two ways: using hand carders or a wool carding machine. To use the hand carders, the wool is placed between the carders and pulled in opposite directions, thus combing and fluffing the wool. The use of wool carding machines is a faster procedure. Pieces of wool are “fed” into the carder drum, which is turned by hand to comb out a batt of wool. This process is now often done commercially. The carded wool lies out flatly in “batts”. These “batts” form the inside of the quilt.
Construction of the Quilt
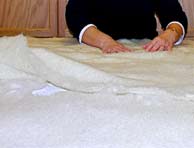
The inner lining of the quilt is usually cheesecloth, but can be another lightweight, cotton fabric. The wool batts are placed evenly on the lining, first lengthwise and overlapping each other, then crosswise, to a thickness of approximately two to two and a half inches. It is important to spread the wool to the very outside edges of the lining: to give fluffiness to the outside edges of the finished quilt. Another layer of lining is placed over the wool batts and all three layers are now loosely basted by hand to hold the “filler” together.
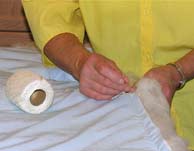
The quilt top and bottom fabrics now are sewn, using a ¾ inch seam allowance This cover is sewn together on three sides with the fourth side being left open with a 22 inch opening for inserting the wool basted filler into the quilt. The cover, top wrong side against the wool is stretched and pinned at the corners. The filler, being slightly longer and wider than the quilt top, is eased in to fit the quilt top measurements. The filler is stitched to the wrong side of the cover top at the seam allowance to secure the inner layer and thus, prevent it from shifting. The cover is then turned out to the right side with the filler now inside. The opening is hand sewn shut.
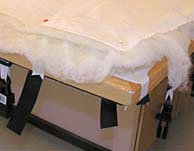
The next step is to baste four firm 4 -5 inch wide strips of fabric (eg. denim or curtain heading) to the 4 edges (perimeter) of the blanket. An alternative method is to sew or pin fabric tabs to the quilt at even intervals. The quilt is then stretched out on the floor or on a quilting table and the outer strip or tabs are stapled or nailed down to plywood on the floor or a quilting table. In the past, when the quilt was laid out on the floor, it was directly nailed to the floor. When new homes were built and floors were covered with carpets and linoleum, the quilts were stretched on the floor, but on top of plywood, and secured to the plywood to avoid damage to the flooring. The blanket is hand quilted at this stage and the attached strips of fabric or tabs are removed only after the quilting is totally completed.
At the CIS the quilters use adjustable clamps sewn to Velcro strips for stretching the quilt. These clamps are attached to the quilt at 10 -12 inch intervals and the quilt is stretched evenly. The Velcro ends are adjusted and secured to another Velcro strip that is attached to the underside of their table.
A quilt pattern or design is now chosen and chalked on to the cover. An outer border is stitched first to achieve a picture frame effect for the inner design. The stitches in the quilting process are very fine and delicate. A well-made quilt will have stitches that are the same length on both sides. These stitches are for the purpose of tacking the top layer of the quilt to the bottom. After the fine quilting is complete, the quilt is finished and ready for use. The quilts are very warm, light and fluffy and ideal for both the summer and winter months.
View Examples of Doukhobor
Quilts in Our Web Gallery
To previous page in this Section To Next Page in this Section